Captin Titus Cabinet
- Apr 20
- 3 min read
Updated: 7 days ago
This project was to create a display cabinet for the Warhammer 40K model of Captain Titus. The Den is a play space for the community to come and play various tabletop war games like Warhammer 40k. Being tasked with creating a more immersive area I wanted to bring the limited edition Titus model out of the back room and display it in a safe cabinet for all to enjoy.

I had an idea of creating a playing card from the Warforge online game of Warhammer 40k into a three dimensional cabinet to display Titus. This was a complex project which took a few months to complete and perfect.
The images show the major stages of the project and give some indication to the complexity and amount of work that went into pulling off this project.
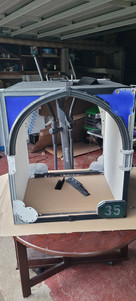
I started by designing the trim for the outside and getting the measurements of the resin model, built a frame & boxed the sides with 10mm sterling board. Front and rear panels are cut from 5mm MDF. Once built I changed my mind on the exterior finish from just painting it blue to painting the inside of perspex blue and mounting it on the outside, this threw out all the exterior trim because I needed a few extra mm, I also extended all the edging trim to cover the mounting screws because I wanted the finish to look as seamless as possible.
Primed all the wood and gave all the PETG printed trim a few coats of high build primer so I had enough to sand smooth before covering with a few coats of gun metal grey and dry brushing citadel leadbelcher, finally added some wear detail. The interior was to be covered with a mirror roll so I skimmed the wood with body filler and sanded to a smoother finish than the sterling board and at this stage realised that I should have used plywood to make this section much easier.
Now that all the main build was complete I coated all the printed parts with a matt lacquer, painted the bottom black added the grass and went in search of something that would take the weight of the heavy model and the cabinet. You know the raillings that are bolted to the floor around town, well I managed to find one left over from a job in the local metal works and it was perfect.
The front a rear perspex were cut to size from 5mm sheets and only needed a light sanding to make flush.
Wanting the interior lights to give a glow rather than a bright shine the track was printed in white PLA with a 2mm top, as you can see from the images the LEDs are still slightly visible but I wanted to get the model in before making any further changes.
The turntable was right on the weight limit for the model so we fitted it and tested it with a bucket of stone to the correct weight and luckily that thing has some serious torque.
The final push was to paint the base in Hammerite hammered silver, make a mounting plate to screw to the windowsill so that the cabinet couldn't be knocked over, this also gave us a place to hide the wiring and as you might have seen from the Wolf light we like to use the faux ivy to cover the frame.
It looked great and I had anticipated being able to see it from outside the window in the carpark and it looks awesome at night.
I'm very greatful to Pete from Fazpack for giving me the opportunity to produce something for the community that I love.


Comments